Indian Visa For Us And Lithuanian Citizens:
If you’re a US or Lithuanian citizen planning a trip to India, understanding the visa process is crucial. This article will guide you through the different types of Indian visas available and provide detailed steps on how to obtain one.
By following these instructions, you will learn how to check the visa requirements specific to your nationality, complete the online application form, pay the necessary fees, schedule an appointment, attend the visa interview, and finally, receive your Indian visa.
With this information at your fingertips, you’ll be well-equipped to navigate the visa application process smoothly and start preparing for your exciting journey to India.
Key Takeaways
- Review Indian visa application requirements and guidelines thoroughly
- Prepare for the visa interview by researching common questions and practicing responses
- Maintain good communication skills, eye contact, and stay calm during the visa interview
- Start planning trip to India and map out a detailed trip itinerary for a fulfilling experience
Understand the Different Types of Indian Visas Available
Want to explore India? Learn about the different types of Indian visas available for US and Lithuanian citizens!
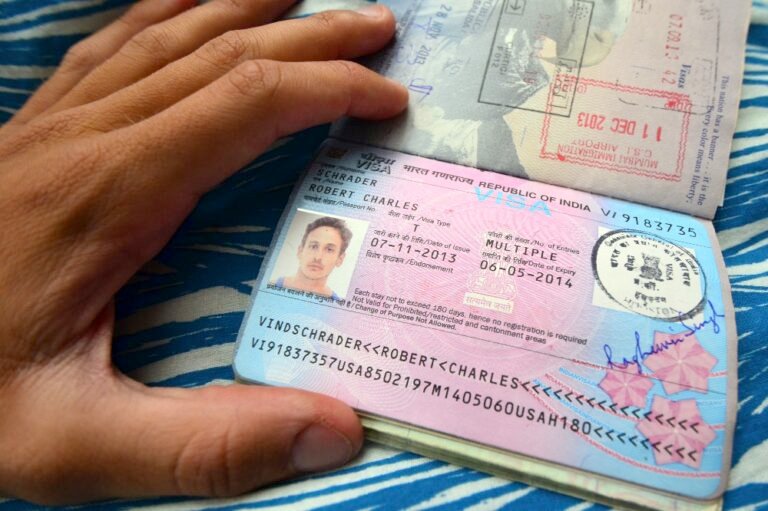
When applying for an INDIAN VISA FOR LITHUANIAN CITIZENS, it’s important to understand the various INDIAN VISA FOR US CITIZENS categories that cater to different purposes of travel. For US and Lithuanian citizens, the most common types of Indian visas include tourist visas, business visas, and e-visas.
Tourist visas are typically valid for up to 10 years with multiple entries allowed, making them ideal for leisure travelers planning to visit India multiple times within the validity period.
On the other hand, business visas are suitable for individuals traveling to India for business-related activities such as meetings, conferences, or trade fairs, and they usually have shorter validity periods compared to tourist visas.
Additionally, e-visas have become a popular option for US and Lithuanian citizens as they can be conveniently applied for online and offer shorter processing times for entry into India for tourism, business, or medical purposes.
To ensure a smooth visa application process, it is crucial to check the visa requirements for US and Lithuanian citizens before submitting your application. Understanding the specific documentation, fees, and eligibility criteria will help you prepare a complete and accurate visa application, increasing your chances of obtaining the desired Indian visa.
Check the Visa Requirements for US and Lithuanian Citizens
Explore the specific requirements needed for travelers from the United States and Lithuania before planning your trip. When applying for an Indian visa, it’s essential to understand the visa eligibility criteria for citizens of the US and Lithuania.
US citizens must have a valid passport, a recent passport-sized photograph, a completed application form, proof of residential address, and a copy of their itinerary while in India. Additionally, they must provide proof of sufficient funds to cover their stay and return ticket.
Lithuanian citizens, on the other hand, need to meet similar requirements, including a valid passport with at least six months validity, a recent passport-sized photograph, a completed application form, proof of financial stability, and a copy of their travel itinerary. It’s crucial to carefully review and follow the document submission guidelines to ensure a smooth visa application process for both US and Lithuanian citizens.
To proceed further, complete the visa application form online.
Complete the Visa Application Form Online
To complete the visa application form online, you need to first create an account on the Indian visa application website.
Make sure to fill out the application form accurately with all the required information.
Don’t forget to upload the necessary documents as specified to avoid any delays in processing your visa application.
Create an account on the Indian visa application website
Start by creating an account on the Indian visa application website to begin the process of applying for your visa.
Enter your personal information, such as name, email, and password, to set up your account.
Follow the prompts to verify your email and log in to the user-friendly interface designed for a seamless user experience.
If you encounter any issues during the account creation process, check the troubleshooting section for assistance.
Once you have successfully created your account, you can proceed to fill out the application form accurately for your Indian visa.
Fill out the application form accurately
Make sure you provide all the required information in the application form accurately to avoid any delays or complications in the process.
Common mistakes to watch out for include typos, missing information, and incorrect dates. Double-check your entries before submitting the form to ensure accuracy.
Application tips suggest using the same name as in your passport, providing a valid email address, and answering all questions truthfully.
Remember to select the correct visa type based on your purpose of travel to India.
Once you have completed the application form accurately, you can proceed to upload the required documents for further processing.
Upload required documents
Ensure that all necessary documents are uploaded accurately to support your application for travel to India. Before submitting your application, make sure you have completed the document submission process correctly.
The Indian visa authorities will conduct a thorough document verification process to ensure all information provided is accurate and valid. To avoid delays or rejections, follow these guidelines for uploading your required documents:
- Upload a clear scan of your passport bio-page.
- Provide a recent passport-sized photograph with a white background.
- Include proof of residence or employment in your home country.
- Submit a copy of your travel itinerary or flight reservation.
Once all documents are uploaded, you can proceed to the next section about paying the visa application fee.
Pay the Visa Application Fee
To pay the Visa Application fee, you’ll need to be aware of the fee amount and the payment methods accepted.
The fee amount may vary depending on the type of visa you’re applying for and your nationality. It’s important to check the official website for the most up-to-date information on fees and accepted payment methods.
Understanding the processing time for visa approval is crucial. It can vary depending on various factors such as the volume of applications and the type of visa you’re applying for.
Fee amount and payment methods
Payment methods for the Indian visa fees can be easily completed online, allowing travelers to efficiently submit the necessary funds. When making the payment, you can choose from various payment options such as credit/debit cards, net banking, or e-wallets, ensuring secure transactions.
Additionally, for those eligible, there may be a fee waiver or discount available, so be sure to check if you qualify before proceeding with the payment.
Once the payment is successfully processed, the next step is to wait for the processing time for visa approval, which will be discussed in the following section.
Processing time for visa approval
Now that you are familiar with the fee amount and payment methods, let’s talk about visa processing time for approval.
The processing time for an Indian visa can vary depending on various factors, such as the type of visa you are applying for and the current workload at the consulate or embassy. It is essential to apply well in advance to avoid any delays in getting your visa approved.
However, if you are in a hurry, you can explore expedited processing options for an additional fee. These options can help you get your visa approved faster, but keep in mind that they may not always be available or guaranteed. Planning ahead and considering expedited processing can make your visa application process smoother and more efficient.
Transitioning into the subsequent section, let’s discuss how to schedule an appointment at the Indian embassy or consulate.
Schedule an Appointment at the Indian Embassy or Consulate
Looking to schedule an appointment at the Indian Embassy or Consulate? Here are some tips to help you navigate the process smoothly:
- Check Appointment Availability: Before you start the scheduling process, make sure to check the availability of appointments at the Indian Embassy or Consulate. Sometimes, there may be a high demand for appointments, so it’s essential to plan ahead.
- Rescheduling Options: If you need to reschedule your appointment for any reason, make sure to do so in advance. Most embassies and consulates have specific guidelines for rescheduling appointments, so be sure to follow their instructions to avoid any issues.
- Required Documentation: Make sure you have all the necessary documentation prepared before scheduling your appointment. This may include your passport, visa application form, photographs, proof of travel arrangements, and any other supporting documents required for your visa application.
- Preparation is Key: Take the time to review all the requirements and guidelines for your visa application before scheduling your appointment. Being prepared will help streamline the process and increase your chances of a successful visa application.
Ready to schedule your appointment? Once you have all your documentation in order, you’ll be one step closer to attending the visa interview.
Attend the Visa Interview
Prepare yourself for the visa interview by researching common interview questions and practicing your responses to ensure you present yourself confidently and effectively. Make sure to dress appropriately for the interview, as first impressions are crucial. Business casual attire is usually recommended for visa interviews, so opt for clean, neat clothing that shows respect for the process.
When attending the visa interview, remember to arrive on time and bring all the necessary documentation. Be polite and respectful to the consular officer, as they will be assessing your eligibility for the Indian visa. Answer questions honestly and confidently, providing clear and concise responses. Some common interview questions may include inquiries about your purpose of visit, travel plans, and ties to your home country.
To ace the interview, practice good communication skills, maintain eye contact, and stay calm throughout the process. It’s important to demonstrate your genuine intentions to visit India and return to your home country after your trip. By following these interview tips, you can increase your chances of obtaining the Indian visa smoothly and efficiently.
As you prepare for the visa interview, remember to stay positive and confident. After successfully completing the interview, you will be one step closer to receiving your Indian visa and start planning your trip.
Receive Your Indian Visa and Start Planning Your Trip
Upon receiving your approved visa, it’s time to start mapping out your exciting trip to India. Here are some steps to help you get started:
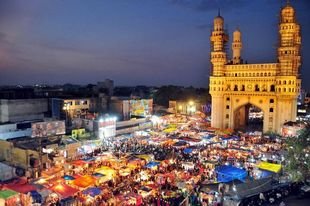
- Trip Itinerary: Now that you have your visa in hand, it’s time to finalize your trip itinerary. Make a list of all the places you want to visit and the activities you want to do while in India. Whether you’re interested in exploring the bustling streets of Delhi, marveling at the beauty of the Taj Mahal in Agra, or relaxing on the beaches of Goa, having a well-planned itinerary will ensure you make the most of your time in this diverse country.
- Sightseeing Plans: With your visa processing out of the way, it’s time to start making detailed sightseeing plans. Research the top attractions in each city you plan to visit, and consider booking any tours or activities in advance to avoid missing out on popular spots. Don’t forget to factor in some time for spontaneous adventures and exploring off-the-beaten-path gems.
- Travel Arrangements: Now that you have your Indian visa, it’s time to book your travel arrangements. Whether you’re flying into Mumbai, Chennai, or another major city, make sure to secure your flights and accommodations early to get the best deals. Consider also arranging for transportation within India, such as hiring a driver or using public transportation, to make getting around easier during your trip.
Start planning your Indian adventure today and get ready for an unforgettable experience in this vibrant and culturally rich country!
Frequently Asked Questions
Can US and Lithuanian citizens apply for an Indian visa online or do they need to apply in person at the embassy or consulate?
You can apply for an Indian visa online. However, if you need a faster processing time or have an emergency situation, you may need to visit the embassy in person for an expedited visa application.
Are there any specific restrictions or requirements for US and Lithuanian citizens when applying for an Indian visa?
When applying for an Indian visa, ensure you meet the specific requirements. Check the visa validity and have a detailed travel itinerary. Make sure to follow all guidelines and provide the necessary documents for a smooth application process.
How long does it typically take to process an Indian visa for US and Lithuanian citizens?
Typically, it takes around 5-7 business days to process an Indian visa. You can apply online or in person, but make sure to meet all the requirements for a smooth application process.
Are there any additional documents or information that US and Lithuanian citizens need to provide when applying for an Indian visa?
When applying for an Indian visa, US and Lithuanian citizens may need to provide additional requirements for document verification. Processing time may vary, but emergency requests can be accommodated if necessary.
Is it possible to expedite the processing of an Indian visa for US and Lithuanian citizens in case of an emergency or last-minute travel?
If you have an emergency or last-minute travel, you may be able to expedite the processing of your Indian visa. Contact the consulate or embassy for options and requirements to fast-track your application.
Conclusion
Congratulations on successfully completing the Indian visa application process! You are now ready to start planning your trip to India.
Make sure to double-check all your travel arrangements and documents before you depart. Remember to pack your bags and get excited for an unforgettable journey filled with rich culture, delicious food, and beautiful sights.
Safe travels and enjoy your time exploring all that India has to offer!